

This post is the start of a series where we embark on a journey into computer vision. In this series we will build a pothole detection application . We will be using multiple methods through out this series which includes computer vision techniques using opencv, annotating images using labelImg, mastering object detection techniques like RCNN, Yolo,Tensorflow object detection API, Training objection detection using transfer learning, Object detection on video etc. This series will be split across the following posts.
1. Introduction to object detection ( This post)
2. Data set preperation and annotation Using labelImg
3. Building your road pothole detector from scratch using Image pyramids and Sliding window
4. Building your road pothole detector using RCNN
5. Building your road pothole detector using YOLO
6. Building you road pothole detector using Tensorflow object detection API
7. Building your video analytics application for detecting potholes
8. Deploying your video analytics application for detection of potholes
You will be covering a lot of ground in this series and by the end of the series would have set a good understanding on different computer vision techniques. Let us get going on this exciting with an introduction to Object dectection
Introduction to Object detection
Object detection entails detecting and localising objects in images or video. Object detection process involves multiple techniques including object annotation, image preprocessing, bounding box localisation and image classifications to name a few. Object detection has broad applications in personal devices, public services and industrial processes. One of the prominent use case which you in your day to day use is the bounding box detection on your phone.


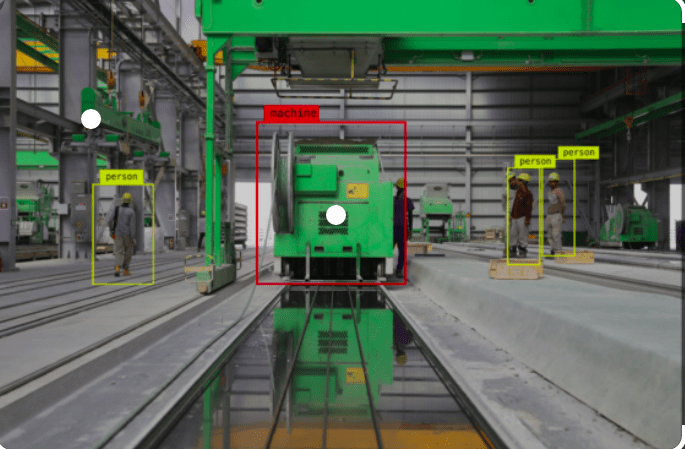


From such simple use cases like face detection object detection techniques can be used for real world examples with large impact like road traffic accident prevention, detection of defects in factory assembly line, detection for military purpose etc are some of the notable examples.
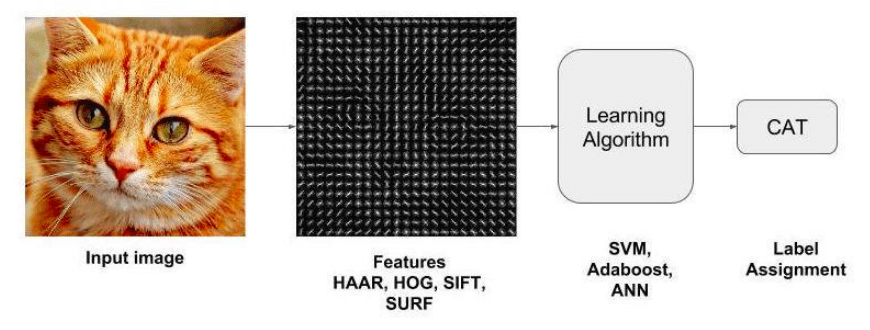
Object detection is not a new phenomenon. It has existed from the time computer vision has existed and has evolved a great deal from the earlier techniques. The early processes of object detection involved manually extracting features and then using classifiers to defect objects.
Some of the earlier techniques for feature extraction involved techniques like HOG ( histogram of oriented gradient), Haar and SIFT ( scale-invariant feature transform). Once features were extracted using these algorithms, classification of the images were done using classifiers like SVM ( Support vector machine) or other classification algorithms like Random forest or Adaboost.
These traditional machine learning techniques relied on extracting and classification of low-level feature information and for that matter wasnt able to scale well for complex use cases. However with the advent of deep learning, a host of techniques matured which scaled well to multiple use cases. Some of the prominent ones are R-CNN ( region based convolutional neural networks), SSD ( single shot multiBox detection), YOLO ( you only look once). These techniques provided much greater accuracy over the tranditional techniques. Now many frameworks like Tensorflow and Pytorch provide custom object detection capabilities with it. Some of the prominent frameworks like transformers are also being used widely for object detection tasks. One such object detector is the Vision Transformer which is used for image classification.

In this post, we will look at the evolution of different techniques and understand these techniques conceptually. This post will lay the foundation for the object detection application we will be building progressively over this series. In the course of this series we will get hands on experience in each of these techniques and then finally tie all of them together in the pothole detection application where we will use the trained model to detect potholes on videos. I can assure you that this is going to be a very exciting journey.
Evolution of object detection techniques
When learning about Object detection, let us start from the legacy methods. The idea is to understand how different techniques evolved over time.
Template matching
Template matching method can be termed as a naive approach for detecting objects in an image. In this method, a template of the object which we want to detect is slid accross the image and the correlation of the template with the input image is captured. The location where the correlation is the highest is predicted as the location of the object.

As shown in the figure above, the template of the pothole is slid across the image. The correlation coefficient between pixel intensities of the template and image is captured and the best matching location is identified. This can easily be implemented using frameworks like OpenCV.
Being a simple method, template matching is also fraught with limitations. One problem which often crops up is the one related to different scales used for template and the image. If the scales for the template and image are different, then detection of objects, very often, becomes erroneous.
Another problem is the visual deviation of the object in the template and image. If the visual effects of the objects is different from that of the template, detection of object on the image suffers considerably.
Template matching techniques is one of the earlier methods employed for object detection and is no more in use in any of the modern object detectors. Next we will explore a method whose concepts are used in many of the advanced methods – Image pyramids and sliding window
Image pyramid and sliding window methods for Object detection
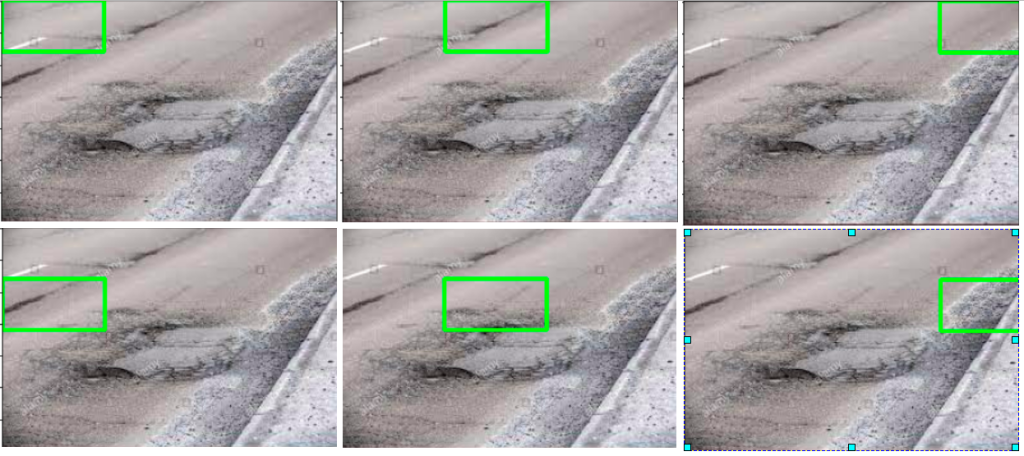
Let us try to understand the concept of image pyramids with an example. Let us assume that we have a window of fixed size for detecting potholes and that potholes are detected only if the pothole fits perfectly inside the box. With such a fixed sized window we might not be able to detect all potholes that might be present in an image. Take the case of layer1 of the image below. We can see that the fixed sized window was able to detect one of the potholes further down the road as it fit well within the window size, however bigger potholes at the near end the image are not detected as the box is smaller than the pothole.
As a way to solve this, let us progressively reduce the size of the image keeping the size of the box as constant. This can be seen below as we traverse from layer 1 to layer 7 in the figure below. With the reduction in size of the image, the object we want to detect also reduces in size and as our detection window remains the same, we are able to detect potholes with multiple sizes.

This process of progressively scaling an image to detect objects is the underlying technique used in image pyramids. The name image pyramids signifies the fact that, if the scaled images are stacked vertically, then it will fit inside a pyramid as shown in the below figure.
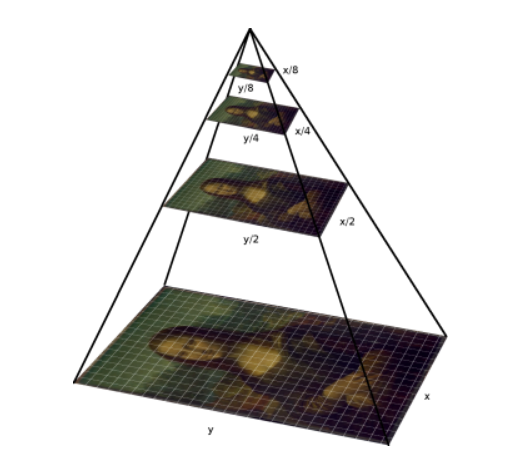
There are many different types of image pyramid implementation. Some of the prominent ones are Gaussian pyramids and Laplacian pyramids.
Image pyramids alone do not help in detecting objects. This method has to be implemented in conjunction with a method called sliding windows which enables detection of objects in an image at various scales and locations. As the name suggests, this method involves sliding a window of standard length and width accross an image to extract features. These features will then be used in a classifier to identify the object of interest.
We will be building an object detector from scratch using image pyramids and sliding windows in the third post of this series.
Next let us get to know some of the advanced methods for object detection which are built on deep learning models.
RCNN Framework
This framework was originally introduced by Girshik et al. in 2013. There have been several modifications to the original architecture, resulting in better performance over time. For some time the RCNN framework was the go to model for object detection tasks.
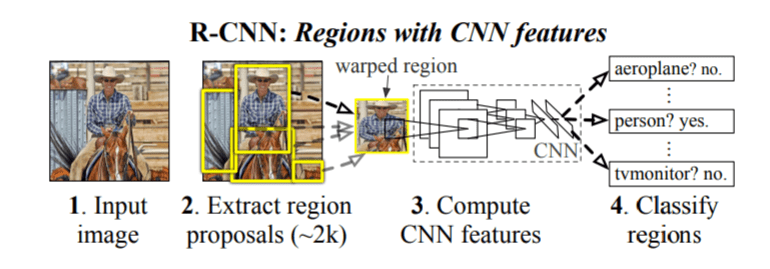
The original RCNN algorithm contains the following key steps
- Extract regions which potentially contain an object from the input image. Such extractions are called regions proposals extractions. The extraction was done using an algorithm like selective search.
- Use a pretrained CNN to extract features from the proposal regions.
- Classify each regions extracted, using a classifier like Support Vector Machines ( SVM).
The original RCNN algorithm gave much better results than traditional methods like the sliding window and pyramid based methods. However this system was slow. Besides, deep learning was not used for localising the objects in the image and it was mostly left to algorithms like selective search.

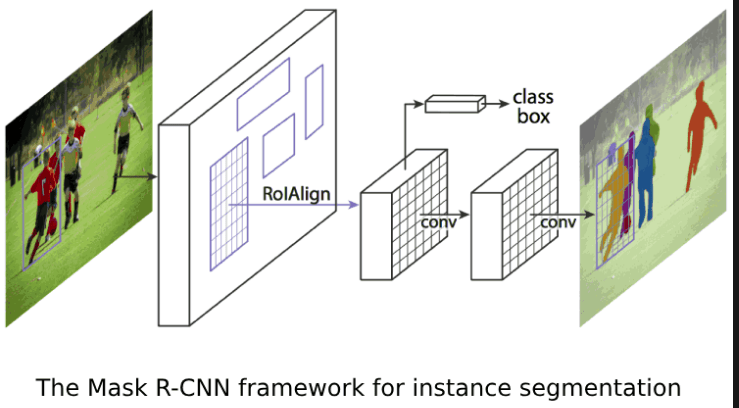
A significant improvement was made to the original RCNN algorithm, by the same author, within a year of publishing of the original paper. This algorithm was named Fast-RCNN. In this algorithm there were some novel ideas like Region of Interest Pooling layer. The Fast-RCNN algorithm used a CNN for the entire image to extract feature map from it. A fixed size window from the feature map was extracted and then passed to a fully connected layer to get the output label for the proposal regions. This step was termed as the Region of Interest Pooling. Two sets of fully connected layers were used to get class labels of the regions along with the location of the bounding boxes for each region.
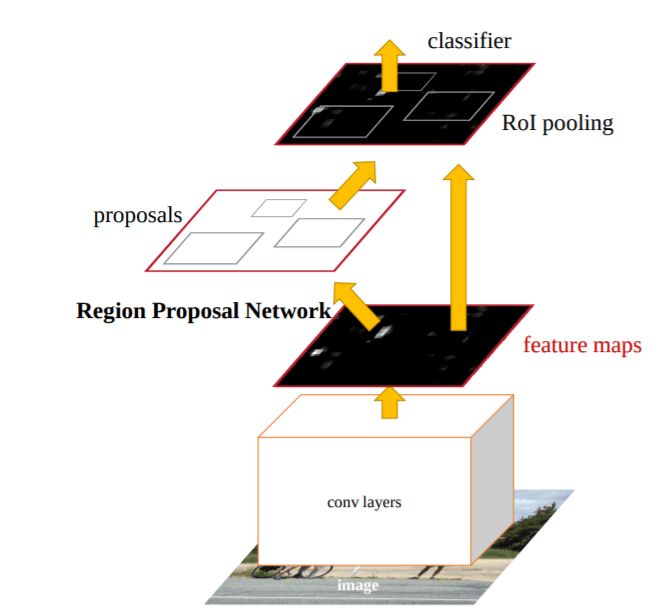
Within couple of months from the publishing of the Fast-RCNN algorithm another algorithm called the Faster-RCNN was published which improved upon the Fast-RCNN algorithm. The new algorithm had another salient feature called the Region Proposal Network ( RPN), which was introduced to eliminate the need of selective search algorithms and build the capability for region proposal into the R-CNN architecture itself. In this algorithm, anchors were placed uniformly accross the entire image at varying scale and aspect ratios. These anchors would be examined by the RPN and a proposal as to where an object is likely to exist is then output by the RPN.
R-CNN architecture generate potential regions of bounding boxes in an image. These potential regions are then classified using a classifier. These classified regions are then pre-processed to refine bounding boxes, eliminate duplicate detections and rescore boxes on other objects in the image. We will be implementing an object detector using RCNN in the fourth post of this series.
YOLO Algorithm
YOLO which is an acronym for 'You only look once' is a simple algorithm which treats object detection task as a single regression problem processing an image from its pixels to bounding coordinates and class probabilities in a straight through process. This algorithm has at its core a single convolutional network which predicts multiple bounding boxes and class probabilities simultaneously.
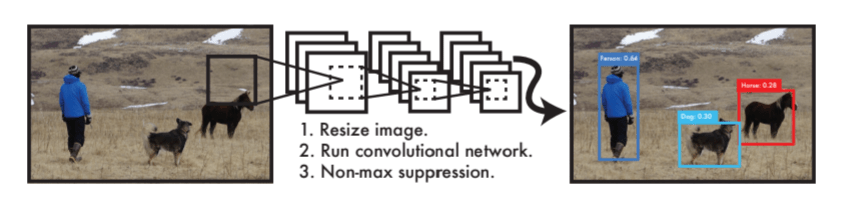
An input image is divided in equal sized square grids. Each grid predicts multiple bounding boxes and confidence score for those boxes. The confidence scores indicate how confident the model is that the box contains an object.YOLO combines all components of object detection into a single neural network and this network uses features from the entire image to predict each bounding box. The bounding boxes of all classes are predicted simultaneously.
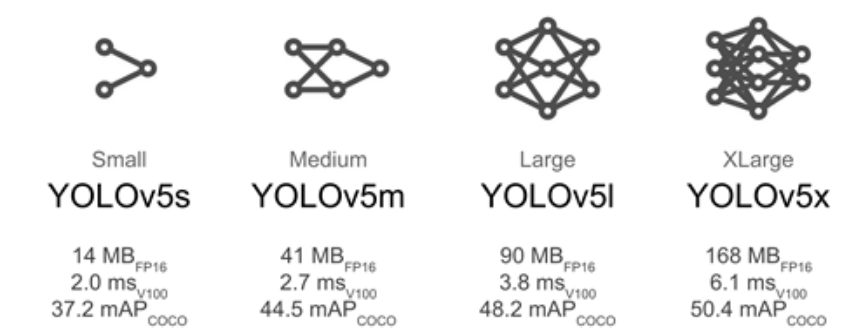
There are multiple variations of YOLO, starting from YOLOv1 – YOLOv5 to PP-YOLOv2 released in April 2021. The accuracy of the models are close to but usually not better than R-CNNs, however where they stand apart is in their detection speed which makes it good choice for real-time video or with camera feed. We will be implementing a YOLO object detector in the fifth post of this series.
Single Shot Detector (SSD) Algorithm
When we discussed the R-CNN architecture, we understood that it has multiple processes which includes
- A Region proposal network ( RPN)
- ROI pooling
- Image classifier.
All these processes are encapsed in the single framework, which considerably slows down the training process. In addition to these issues, the inference is also very slow which makes real time object detection painful. We saw how many of these issues were solved in the YOLO algorithm. SSD like YOLO is another approach which addresses all these issues and thereby achieve localization and detection in a single forward pass of the network during inference time. SSD framework was introduced by Liu et al in their 2015 paper, SSD : Single Shot Multibox detector
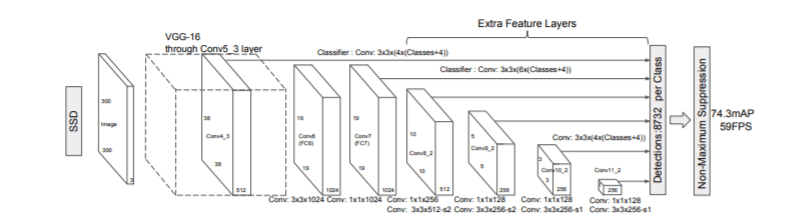
SSD has a base network, which typically is a pre-trained normally on large data sets like Imagenet. When this framework was first introduced VGG16 was used as the base network. However now there are much better base networks than VGG16 like MobileNet, SqueezeNet etc which gives better accuracy.
SSD framework uses a frameworks similar to Multibox algorithm published by Szegedy et al. It needs an input image and ground truth boxes for each object, during training. A set of default boxes with different scales and aspect ratios are evaluated in each feature map during the training process. For each of these boxes prediction on the shape of the offsets and confidence score on the object categories contained is done. These default boxes are then compared to the ground truth bounding boxes and then losses are calculated based on the localisation and confidence.
SSDs framework provides a unified end to end framework for object detection. However one criticism for SSD is that it dosent detect small objects in an image quite well. A common workaround for this problem is to increase the size of the image. Despite these small drawbacks, SSD provides an excellent end to end framwork for object detection.
Object detection using Tensorflow object detection API
Tensorflow object detection API is a framework that makes the task of training and deploying object detection very easy. The API also makes use of many pre-trained models which adds to the flexibility of the framework. Different types of model architectures can be easily implemented from scratch using the API framework. This ensures lesser number of moving parts when implementing complex tasks like object detection. When doing object detection, TFOD API is a go to tool to quickly scale and implement a object detection model. We will also be implementing our object detection framework using TFOD API in post 6 of this series.
What Next ?
In this post we reviewed some of the frameworks for object detection. The idea was to understand some of the critical parts of each of these frameworks. In the subsequent posts, we will train our pothole models using some of the most important frameworks.
In the next post we will deal with the issue of preperation of annotated dataset for our purpose. We will see how we can use labelImg framework to annotate the data sets and then extract the classes and bounding boxes from the annotated images. Preperation of your own data set will enable you to build your custom object detctors. Publicly available data sets like the COCO data for object detection comes with annotated images for certain set of objects. However if you want to put object detection to use for custom use cases like pothole detection or detection of defective parts in an assembly line, we will have to prepare our own data sets. The next post will enable you to build your own annotated data sets for your custom projects.
The next post will be published next week. To be notified of the next post please subscribe to this blog post .You can also subscribe to our Youtube channel for all the videos related to this series.
Watch out this space for more.
Do you want to Climb the Machine Learning Knowledge Pyramid ?
Knowledge acquisition is such a liberating experience. The more you invest in your knowledge enhacement, the more empowered you become. The best way to acquire knowledge is by practical application or learn by doing. If you are inspired by the prospect of being empowerd by practical knowledge in Machine learning, subscribe to our Youtube channel
I would also recommend two books I have co-authored. The first one is specialised in deep learning with practical hands on exercises and interactive video and audio aids for learning

This book is accessible using the following links
The Deep Learning Workshop on Amazon
The Deep Learning Workshop on Packt
The second book equips you with practical machine learning skill sets. The pedagogy is through practical interactive exercises and activities.

This book can be accessed using the following links
The Data Science Workshop on Amazon
The Data Science Workshop on Packt
Enjoy your learning experience and be empowered !!!!
